• Login
sketchucation logo sketchucation
  • Login
⚠️ Libfredo 15.4b | Minor release with bugfixes and improvements Update

Easy digital watercolor

Scheduled Pinned Locked Moved Gallery
83 Posts 25 Posters 134.8k Views 25 Watching
Loading More Posts
  • Oldest to Newest
  • Newest to Oldest
  • Most Votes
Reply
  • Reply as topic
Log in to reply
This topic has been deleted. Only users with topic management privileges can see it.
  • M Offline
    mirjman
    last edited by 24 Feb 2008, 07:49

    another post per request, this time on a photo i found online. i also included the layer stack at the end. remember majid's rules- this is a "one touch" solution with no human judgements in the process.

    one note is that photoshop filters act according to absolute pixels in an image, that means you will get different results with bigger or smaller base photos, so try to resize them at the beginning to get consistent results. this image was originally 1800x before i cropped it so you could see the detail

    for this I used photoshop cs3 and a free plugin called carravaggio by xero

    1. copy background layer, apply filters in this order: surface blur to get rid of brick texture detail, gaussian blur, colored pencil set layer to "multiply" mode 90% opacity

    2. copy the water puddles layer, apply find edges filter, set to "multiply" mode 50% opacity

    3. copy the background, apply suface blur and caravaggio filters

    4. make a new layer, apply render>clouds filter, apply render>fibers filter and scale in the horizontal direction ~200%, add a layer mask and apply render>clouds filter to the layer mask. set to "overlay" 25% opacity

    5. create paper layer per pixero's directions above (thanks!!!) set layer to "multiply" mode

    6. copy paper layer, set to "soft light" mode 75% opacity

    after that you can adjust contrast/saturation to fit your taste, but the previous steps get to you to a good point in about 10 seconds. I'd be interested to see if anyone else has success with this method...


    version_photo.jpg


    version_wc copy copy.jpg


    layerstack.jpg

    1 Reply Last reply Reply Quote 0
    • M Offline
      majid
      last edited by 25 Feb 2008, 00:07

      thanx so much , i'll try it , BTW i have ps 8 !! .

      My inspiring A, B, Sketches book: https://sketchucation.com/shop/books/intermediate/2612-alphabet-inspired-sketches--inspiring-drills-for-architects--3d-artists-and-designers-

      1 Reply Last reply Reply Quote 0
      • M Offline
        majid
        last edited by 26 Feb 2008, 03:32

        hi dear all
        thanks to mirjman .
        i tried your method , fixed bugs ( over hi contrast pics) and improved it . i tried it over pictures and also Pure SU output , good result , try this action ( full PS 😎 no more outer filers . (remover rb extention , load from action panel in PS)


        dwc-o-f.atn.rb

        My inspiring A, B, Sketches book: https://sketchucation.com/shop/books/intermediate/2612-alphabet-inspired-sketches--inspiring-drills-for-architects--3d-artists-and-designers-

        1 Reply Last reply Reply Quote 0
        • M Offline
          mirjman
          last edited by 26 Feb 2008, 15:20

          i just ran your action straight through on the same photo see attached. it has a nice texture

          i am going to study your action some more, but one thing you can try is setting the "paper brightness" on the color pencil filter very high


          majidaction.jpg

          1 Reply Last reply Reply Quote 0
          • S Offline
            sintra
            last edited by 26 Feb 2008, 20:04

            Hi,

            Maybe this is me being a little dumb, but i dont have much experience with photoshop. 😳

            Could someone please tell me exactly where i need to extract the file to and exactly how it works, maybe a quick step by step.

            Kind regards

            Darren

            1 Reply Last reply Reply Quote 0
            • M Offline
              mirjman
              last edited by 26 Feb 2008, 20:20

              sintra: the step by step method 😃

              1. download majid's file to your computer, and rename the file to remove the ".rb" at the end

              2. open photoshop, go to window>actions to bring up your actions palette

              3. drag the .atn file that you downloaded onto this palette, the action will now show up on your list

              4. open a target image, then highlight the action. push the triangle "play" button and its all automated after that

              1 Reply Last reply Reply Quote 0
              • S Offline
                sintra
                last edited by 26 Feb 2008, 20:49

                Thanks for that buddy, works great 😄

                Darren

                1 Reply Last reply Reply Quote 0
                • M Offline
                  majid
                  last edited by 26 Feb 2008, 23:27

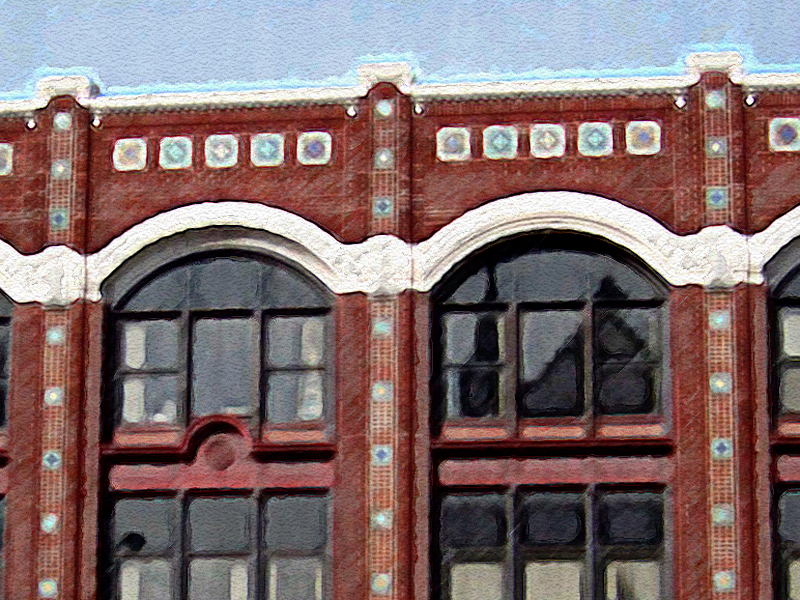
                  did anyone tried the action? plz test it over SU pure output (not renders) . thanx again

                  My inspiring A, B, Sketches book: https://sketchucation.com/shop/books/intermediate/2612-alphabet-inspired-sketches--inspiring-drills-for-architects--3d-artists-and-designers-

                  1 Reply Last reply Reply Quote 0
                  • A Offline
                    Amfab
                    last edited by 9 Feb 2009, 07:02

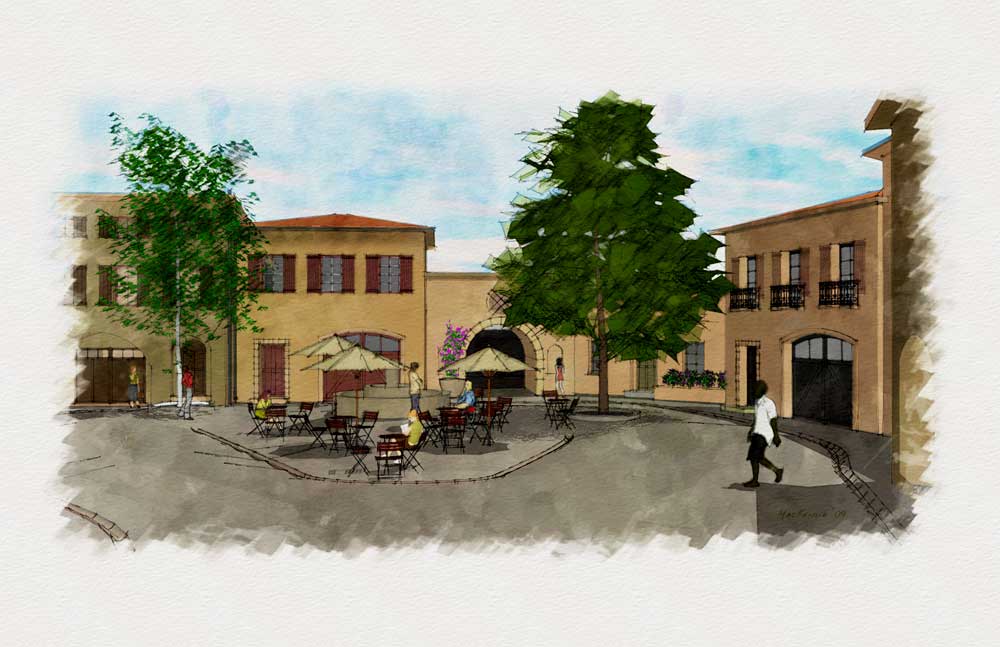
                    Im new here, today actually, and kinda new to Sketchup. It is interesting that this topic is being discussed because I wasn't so happy with some renderings my Architect was doing…
                    I ended up kinda learning Sketchup over the last month or two to show her the angles I wanted for the renderings. She then did a rough rendering and I wasn't too happy with it so I learned some more Sketchup stuff and in the last day or so I started messing with my Sketchup output in Photoshop... I think Im kinda getting there.
                    Maybe you guys can add to what I have done, although I don't think that this is as good as some of the stuff I have seen here, (especially Ross’s stuff-wow) but it is all done with SU7 free and PSCS3
                    Here is what I’m doing:
                    I output three or four versions, changing styles each time.
                    I have been using the Sketchup "Sketchup Style builder competition winners" Styles included with the free version of SU7
                    "Pencil Edges With Whiteout Border. Created by Mark Paschke." Is the one I am using for this.
                    I output Tiffs:
                    One with no background, no sky, edges only (for top layer in PS)
                    One with Sky, Shaded, no edges (for middle layer in PS)
                    One with Sky, Shaded, with edges (for Bottom layer in PS)
                    I stack them in layers in Photoshop in the order mentioned above.
                    On the top I clear out the white so I have only black pencil, I sharpen it up a little
                    The middle one (the one with no edges) I apply the filter Artistic>Poster edges to generate a few large contrast-ey areas...
                    Then Noise>Median to smooth and blotch them out
                    Then if it needs more interest a little “paint daubs”–maybe I didn't use it on this one though.
                    Then I use diffuse glow on the bottom layer, with no graininess–this makes it pop–I so dig that filter–then I fade it back to a reasonable level after applying.

                    I mix the layers together, the bottom layer full strength, then somewhere near 30 percent for the middle layer, combining using “vivid light” helps the colors get that over-saturated watercolor color vibe.
                    I then just adjust the toplayers opacity to make the lines feel sharper.

                    Then I flatten the image and paint a bit by hand with Bit box’s watercolor brushes (no affiliation–and they are free)

                    Link Preview Image
                    Page not found - Bittbox

                    favicon

                    Bittbox (www.bittbox.com)

                    Anything that is very saturated I paint with the main color at maybe 15% transparency, using the “normal” setting. And I make sure to go outside the objects to get the color running on to other objects.
                    After I have done that I then run around with the brushes using multiply at 5-10%.
                    You have to choose different brushes at different sizes and edit them a lot to make it look random.

                    Anyway, I just thought I would put in my cent an a half

                    Attached is the watercolor experiment–I darkened up the jpeg because when I was converting the sky was getting washed out, PC gamma people let me know if it is too dark for you.

                    -Andrew


                    SURender.jpg

                    1 Reply Last reply Reply Quote 0
                    • A Offline
                      Amfab
                      last edited by 9 Feb 2009, 07:16

                      Jan, I just tried your paper, tak så mycket. And by the way using a picture of Sweden isn't fair, as the whole country looks like a watercolor to begin with.

                      -Andrew


                      Withpaper.jpg

                      1 Reply Last reply Reply Quote 0
                      • E Offline
                        Ecuadorian
                        last edited by 9 Feb 2009, 09:53

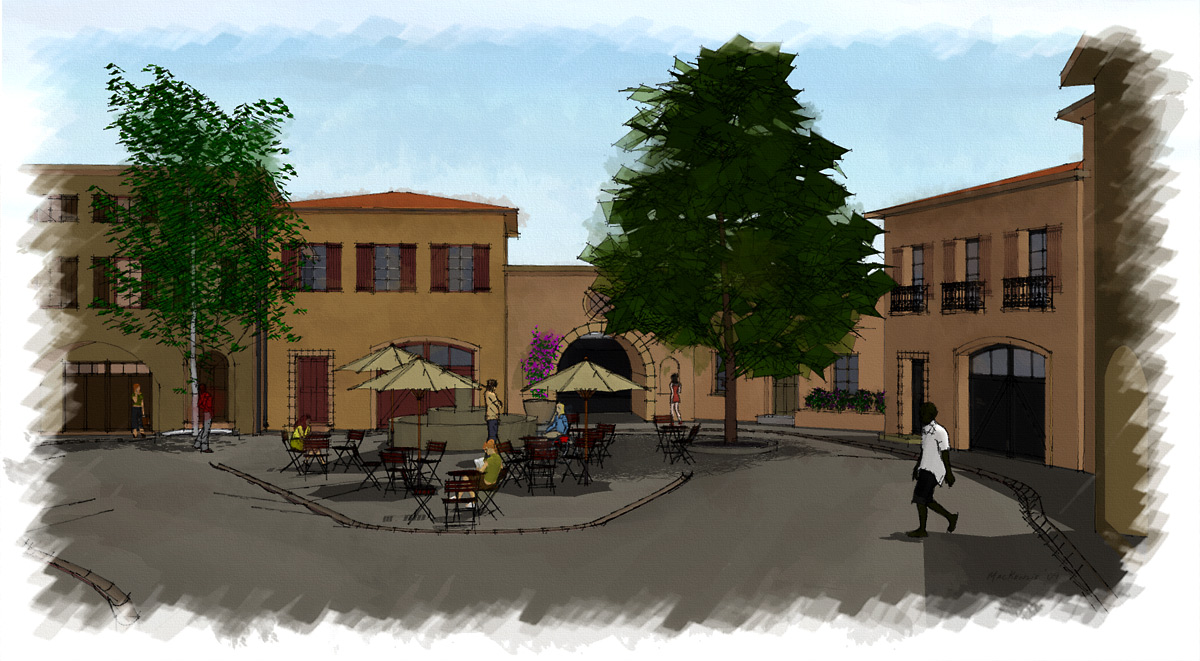
                        Oh, well, since the thread has just been revived, here's my try, using an action I found on the Web:
                        full.jpg
                        detalle.jpg

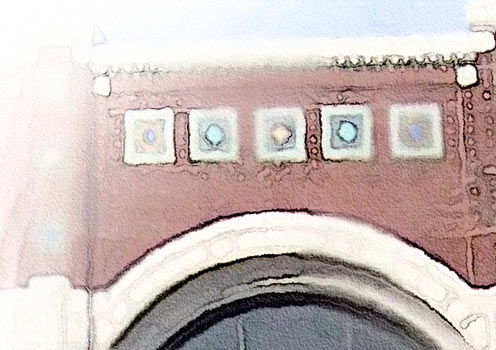
                        Of course, I did some manual preparations before applying the action (Resizing to about 1500px wide, whitening the border, applying Gaussian blur to the border and to several random spots)

                        And here's the action I found. The text file says it's OK to re-distribute as long as you keep it intact.
                        The documentation says it works better on images around 3000px in the biggest dimension, but I think it works equally nice on 1500px images.
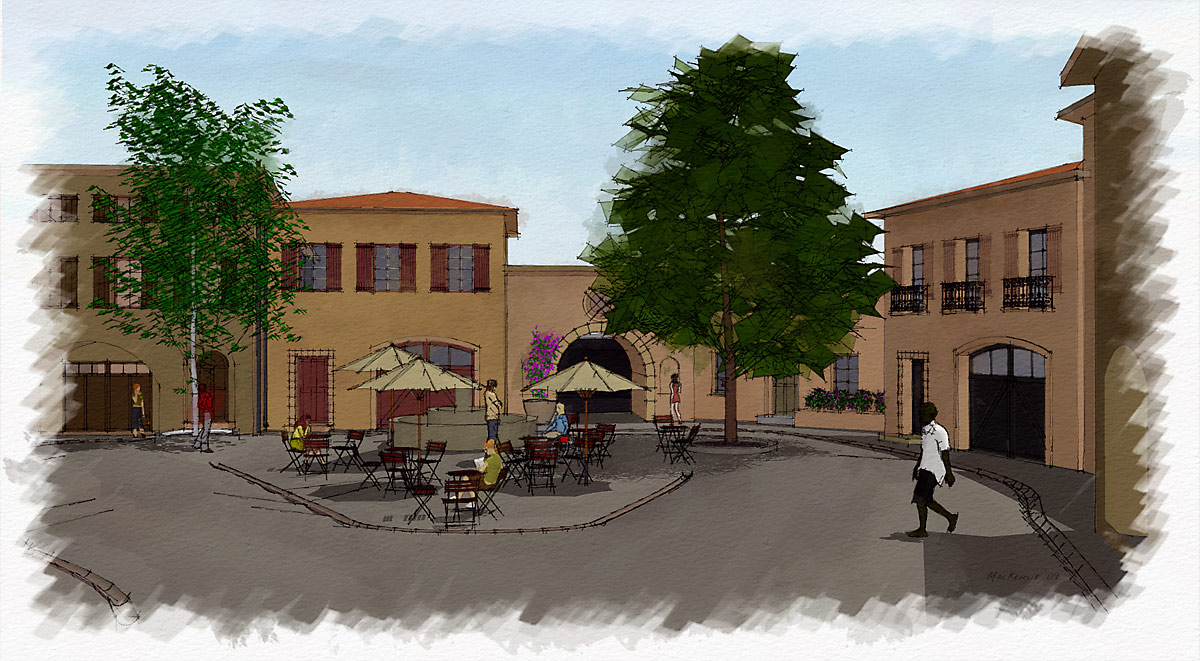
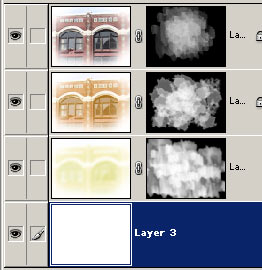

                        WatercolorTintAction.zip

                        -Miguel Lescano
                        Subscribe to my house plans YouTube channel! (30K+ subs)

                        1 Reply Last reply Reply Quote 0
                        • E Offline
                          Ecuadorian
                          last edited by 9 Feb 2009, 19:28

                          Yet another try.
                          layered_watercolor.jpg

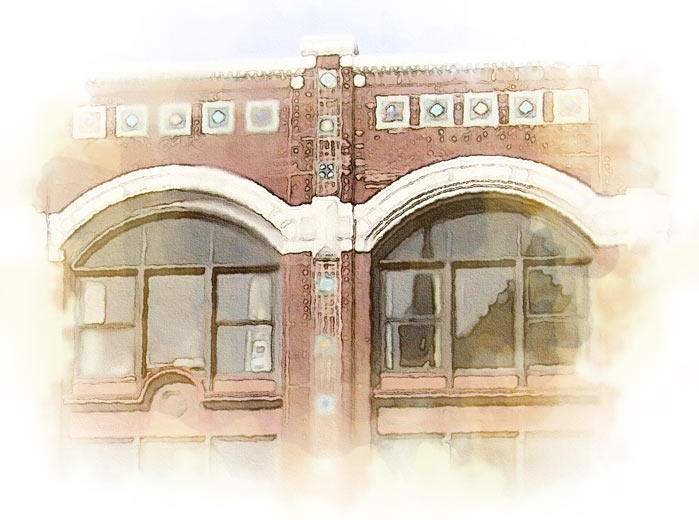
                          This time I applied the effect to a completely blurred version, and put it beneath the regular version. I made another copy of the regular version, and started to alter the curves of the bottom two layers, making them yellowish. I then used layer masks to hide all layers, and revealed them using Photoshop's wetmedia brushes and this brush collection:
                          http://fbrushes.com/2008/11/05/watercolor-1-brushes-pack/

                          Here's how my layers look:
                          layers.jpg

                          A tip: When you use the brushes I linked to, instead of dragging the brush, just apply it in spots. If the brush borders become too distracting in certain parts, blur those parts. Remember that all this work is done in the layer Mask, not the layer itself.

                          -Miguel Lescano
                          Subscribe to my house plans YouTube channel! (30K+ subs)

                          1 Reply Last reply Reply Quote 0
                          • A Offline
                            Amfab
                            last edited by 10 Feb 2009, 21:36

                            HA, I thought this was a recent thread, I read the year wrong, anyway, I messed with it some more and came up with this:


                            Watertry.jpg

                            1 Reply Last reply Reply Quote 0
                            • M Offline
                              majid
                              last edited by 16 Feb 2009, 14:05

                              nice job u did. I've done some recent experiences and soon will share them 😉 . but in short :u can have more/less lost-fond edges (depending on suject) in your render.. and also color variations tahat makes yr job more like watercolor job.
                              majid

                              My inspiring A, B, Sketches book: https://sketchucation.com/shop/books/intermediate/2612-alphabet-inspired-sketches--inspiring-drills-for-architects--3d-artists-and-designers-

                              1 Reply Last reply Reply Quote 0
                              • M Offline
                                majid
                                last edited by 1 Aug 2009, 16:40

                                just to inform you about my refiend trick, not as an action , but using SU+Ps, soon would be published,
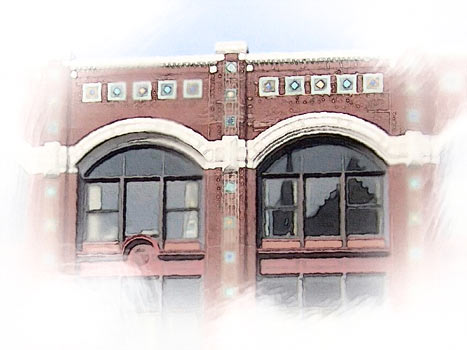
                                here is a sample:detail

                                My inspiring A, B, Sketches book: https://sketchucation.com/shop/books/intermediate/2612-alphabet-inspired-sketches--inspiring-drills-for-architects--3d-artists-and-designers-

                                1 Reply Last reply Reply Quote 0
                                • MALAISEM Offline
                                  MALAISE
                                  last edited by 1 Aug 2009, 17:34

                                  Magic ! Majid , i like this effect really;

                                  MALAISE 👍

                                  La Connaissance n'a de valeur que partagée

                                  1 Reply Last reply Reply Quote 0
                                  • M Offline
                                    majid
                                    last edited by 1 Aug 2009, 18:54

                                    Thanks MALAISE ! 😄 .we hada good discussion here and learned alot from each other, and now after a while the refined simplified trick is ready. I've tried to do the "smart" part by human, so that the Photoshop does it's "fool"ish job, excellent!!!!.
                                    also I've tested the trick over several 3dwh models, all were acceptable and so guess it will rock!!!

                                    My inspiring A, B, Sketches book: https://sketchucation.com/shop/books/intermediate/2612-alphabet-inspired-sketches--inspiring-drills-for-architects--3d-artists-and-designers-

                                    1 Reply Last reply Reply Quote 0
                                    • utilerU Offline
                                      utiler
                                      last edited by 1 Aug 2009, 22:53

                                      look forward to it majid!!!

                                      purpose/expression/purpose/....

                                      1 Reply Last reply Reply Quote 0
                                      • C Offline
                                        Coronel
                                        last edited by 2 Aug 2009, 13:06

                                        Great work

                                        Post marked

                                        1 Reply Last reply Reply Quote 0
                                        • M Offline
                                          majid
                                          last edited by 21 Sept 2009, 16:32

                                          recently I progressed a simple tricky NPR way , you can read about it here:
                                          http://forums.sketchucation.com/viewtopic.php?f=81&t=22093

                                          My inspiring A, B, Sketches book: https://sketchucation.com/shop/books/intermediate/2612-alphabet-inspired-sketches--inspiring-drills-for-architects--3d-artists-and-designers-

                                          1 Reply Last reply Reply Quote 0
                                          • 1
                                          • 2
                                          • 3
                                          • 4
                                          • 5
                                          • 4 / 5
                                          • First post
                                            Last post
                                          Buy SketchPlus
                                          Buy SUbD
                                          Buy WrapR
                                          Buy eBook
                                          Buy Modelur
                                          Buy Vertex Tools
                                          Buy SketchCuisine
                                          Buy FormFonts

                                          Advertisement