Simulation aborted
-
Whilst experimenting with various joint configurations, Something went wrong and I now get the following message:
SketchyPhysics Simulation aborted due to an error!
An error occured whilst starting simulation:
C;/Users/Admin/AppData/Roaming/SketchUp/SketchUp
2014/SketchUp/Plugins/SketchyPhysics3/sp.tool.rb:1270:in 'block in
active_standard'Any suggestions please.
Doug
-
This is called because there is a syntax error in 'scripted' field. You can upload the model, so i could fix it, well, if you can't fix it yourself.
-
Thanks Anton. I'm only interested in the main wheel retract at the moment. Trying to figure how to control the lower leg when the upper control arm is rotated anti clockwise to just over the vertical.
-
Here, I connected the joints, but I'm curious on my settup. Can you verify if its right?
-
Thanks Anton. Yep that's right basically right. Yesterday, I remodeled the lower arm to have only two sections and moved it's top location point.
How did you get the 2 servo's to work off of one slider? In reality, this would be a mechanical connection, turning at the same speed and degrees of rotation. Hopefully, the wheel will remain vertical throughout the operation. If I can't get the SP right, I'll send you the file.
Can this model be copied, flipped, and mounted on the opposite side to have both wheels working in unison? Or do I have to rebuild the whole thing? Later, I would like to add the 'new' reward retracting nose wheel so that the whole thing operates from a single servo slider.Merry Christmas my friend, tis Xmas day here and now.
-
To make 2 servos have same slider, you have to have the both controllers have a slider with the same name. When you create servo joints, by default, they are assigned a controller,
slider("servo#####"). To make two joints use the same slider, both joints should have the controller of same slider name, likeslider("lift").@deskpilot said:
Can this model be copied, flipped, and mounted on the opposite side to have both wheels working in unison?
Ha, that's the weakness of SketchyPhysics. Basically, you can't copy joints, or bodies that are connected with joints. To do that, you have to:
- Delete all joints from the bodies you want to copy.
- Copy and paste what you want.
- Recreate joints.
- And connect all joints accordingly.
If you upload your remodeled lift wheel mechanism, I will do it for you.
@deskpilot said:
Hopefully, the wheel will remain vertical throughout the operation.
You can use the UpVector joint to force the wheel to look up. However, this is not recommended if you try to reproduce the same in real world because there is no such thing as up vector in real world.

@deskpilot said:
Merry Christmas my friend, tis Xmas day here and now.
Thank you! Merry Christmas to you too!
-
Hi Anton, I trust you had a relaxed Christmas. I didn't. I have to admit defeat once again with my model. As you will see, several changes have taken place, all to get it into the confines of the proposed fuselage. I have also, removed one servo and replaced it with a solid link (gears and chain in reality) Hopefully, I have the lengths of the 2 new arms correct to give about a 3:1 reduction ration. Will the wheel remain vertical without resorting to black magic, only you can tell me. If you're not too busy, please wave your magic wand over it. Perhaps you can also explain, in layman's language, what steps, and in what order, you do to make this thing happen.
If you care to do so, the nose wheel could be controlled by the same servo but you'll need to either raise it, or lower the main wheel prior to ganging them.
You might also want to tell me to piss off, that's ok to.
-
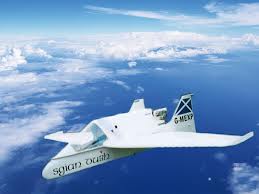
Though you might like to see the plane this is for. Not my design but I'm enlarging it to take my 100kilo frame and will putting a more powerful engine to it. The original is called Sgian Dubh which is Gaelic for dark or hidden knife. (usually tucked into a Scotsman's high sock.)
-
That's a nice mechanism
 I never seen something complex before. I love it!
Your design of the rear wheel gear mechanism did not turn out vertical when the gear was lowered, but I made the two vertical bars 40mm shorter, and as of result the mechanism worked very well. I think rear wheels could go lower, to contact the floor, but I'm not sure on how you want it setup. I posted the model for your investigation. It will be very easy to tweak landing height. You don't have to redraw all arms and change their height. All you have to do, for testing purposes, is move hinges (axis of rotation of arms) a few mm up or down, test it, and then once you find the right alignment, you can redraw arms to their desired lengths.
-
Anton, Anton, Anton. Thank you so much. You did a great job, but we're not there yet. I have to have the full ground clearance so the the 'pusher' propeller doesn't touch the ground as the aircraft rotates for take-off or on flare as it lands. I'll look at getting the nose wheel to fully retract and for the mains to come down lower. I practice, there will be lots of changes to make the whole thing strong enough and stable in the 'X' axis as well. This, though, give me the optimism to carry on.
May all your dreams come to fruition in the new year. Doug -
Thanks, man! I'll be there to help out. At some point I might create a video explaining how I added joints, grouping and connection order, and other rules that at some point will be handy when using SP.
Happy a happy new year!
-
Greeting Anton. Firstly let me wish you and yours a very safe, healthy and prosperous new year.
I'm so glad the 'silly season is over. Perhaps life can get back to normal now.I've modified my nose gear assembly to include the control lever but something is keeping the leg locked as if it were set to static. The small 'locking' link is the same. If there's something hidden, I can't find it. Care to take a look?
The final operation should be, starting with the lever fully back as modeled, pushing it forward should rotate the nose wheel leg to be horizontal and tucked up into the blue foam. Hopefully, the curved actuating bar will reach over the locking mechanism without crashing into it.
Looking at the main wheels, it appears that this might be a step too far in that weight is the enemy and when I add the second system (right hand side) I see a whole lot of weight, and I haven't got the interconnecting hardware modeled yet. Might have to accept a fully streamlined fixed main gear for starters.
-
Here you go!
The small group with two hinges connecting wheel to the lever part - was too small. The 'Default' shape in SketchyPhysics can't process small objects, and it doesn't work so well. Use 'Convexhull2' shape instead. It handles small objects properly.
Here is your fixed model. I managed to get it under 3 MB by purging unused definitions. Here is how you do it in case you interested:
Open Ruby Console, and paste this command:
Sketchup.active_model.definitions.purge_unusedAlso, using TT CleanUp plugin is recommended too. It removes all unused edges and other geometry.
It is a good practice to purge unused geometry from your model before uploading it somewhere.
-
Thanks Anton. I do have TTcleanUp installed and use it. As to why there are still so many errors......?
I'm using the free version of SU and SP, maybe there's a limit to what can happen. Currently I'm trying to get SP camera to work so that I can send an .avi file to the plane's designer. Seems there no tutorial for this and I'm doing the necessary research on the web for inspiration. Do you know where the files are saved? -
Cheers mate. nothing's as easy as SketchUp/SketchyPhysics is it....................NOT

-
Yes, SP could have been made easier to use. I'm working on MSPhysics (a similar project to SP) and I will attempt to make as easy to use as possible.
-
Anton, I've installed Makeavi and have loaded 2500 images. Unfortunately, something goes amiss and the resulting 'video' is split into 4 displaced sections and colours are totally changed. Any idea's as to what I'm doing wrong. I don't get the compression choice you mention but there is a cropping option that I haven't used.
-
Sorted, sort off.
-
When insterting images, try inserting them all at once:
- Click Add Files button.
- Select Ctrl-A and click open. This will import all images at once, in sorted form.
- Set Playback frame rate to 60.
- Click the Begin! button.
- Select video location and name.
- Afterwards Video Compression options dialog will pop up. Select Microsoft Video 1, set Compression Quality to 75 and click OK.
- Afterwards use desired video converter to convert AVI to mp4 or any desired format. You'll find many free video converter software online by google searching free video converter.
I updated prior post with using MakeAVI instructions.
-
The free version of SU should work the same as the licensed version.
To export an animation, do the following:
- Enable SketchyReplay Record button
- Press play and run simulation for desired time
- Reset simulation. It will ask you whether to save animation. Click YES.
- Go to (Menu) > Plugins > SketchyReplay > Export Animation.
- A dialog with options will be displayed.
- Set ReplayCamera? to YES if you want to replay your camera movements.
- Set Save As to PNG or JPG.
- Press OK. This will lead you to choose a saving location. Once you done, a set of images will be exported into the chosen folder.
- Use desired software to combine images into a video. I suggest using MakeAVI. See next steps for instructions.
- One last step. Select (Menu) > Plugins > SketchyReplay > Erase Record. This will remove all animation export data from SU file, which will reduce file size.
Using MakeAVI:
- Launch makeavi.exe
- Click Add Files button.
- Navigate to folder where all generated images are stored.
- Select Ctrl-A and click open. This will import all images at once, in sorted form.
- Set Playback frame rate to 60.
- Click the Begin! button.
- Select video location and name.
- Afterwards Video Compression options dialog will pop up. Select Microsoft Video 1, set Compression Quality to 75 and click OK.
- Afterwards use desired video converter to convert AVI to MP4 or any desired format. You'll find many free video converter software online by google searching free video converter.
Hello! It looks like you're interested in this conversation, but you don't have an account yet.
Getting fed up of having to scroll through the same posts each visit? When you register for an account, you'll always come back to exactly where you were before, and choose to be notified of new replies (either via email, or push notification). You'll also be able to save bookmarks and upvote posts to show your appreciation to other community members.
With your input, this post could be even better 💗
Register Login


Advertisement