Thermal paste application
-
Hello,
Recently, my CPU cooler started to "scream" when I use all the cores for rendering.
I should mention I have an Intel Core 2 Quad Q9400 @2.66GHz.
So, I decided to upgrade my stock Intel cooler. I opted for a Cooler Master Hyper 412S, and probably tomorrow I'll replace the old one.
Now the problem is, after spending half a day browsing the internet, I still scratch my head about the correct technique of applying the thermal compound. I didn't received my cooler yet, but I have the manual/instructions sheet from the internet, and there is an image with the instructions where it said "apply a thin layer of thermal grease onto the surface of the cooler base".
The question is why, on every reviews I watched, the thermal paste was applied onto the processor, with different techniques of course (little dot, line , spread etc.)
I also checked on the Arctic Cooling site where they have a nice guide on this mater, where they said that you should apply that knowing where the cores are (In my case, a horizontal line is need it).
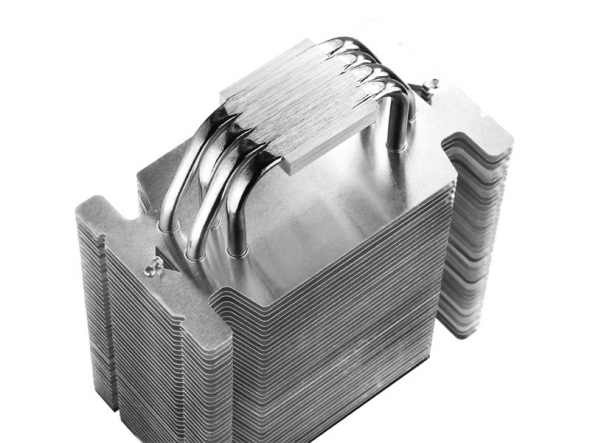
My first choice is the dot option, since is kind of "universal" without greasing the cooler base. Even if it is a cooler with direct contact heat pipes, the surface created by the pipes is flat and uniform, as you can see in the image attached.
Sorry for the long monologue, hopefully, someone with experience share some light in this matter.
Regards,
Stefan
-
http://www.hardwaresecrets.com/article/What-is-the-Best-Way-to-Apply-Thermal-Grease-Part-2/1392/1
I used to apply it to the cpu, but i never had a cooler with direct heatpipes. This test shows they can make a difference.
Normally i use the "spread" method because i think i have more control over it, but using a VERY thin layer of paste not as much as in this test!
Maybe one other solution for this bumpy surface would be to fill only the grooves an then apply a tiny dot on the cpu.
edit: i just found this http://www.arcticsilver.com/pdf/hp/hphs_method.pdf
http://benchmarkreviews.com/index.php?option=com_content&task=view&id=150&Itemid=62&limit=1&limitstart=5 -
Thanks for taking the time to answer, Numerobis!
I think I'll make some tests, clean and reapply just to be sure it is spread correct.
Thanks again! -
The cores in my i5 2500k are lined up on one side. thus the line makes sense. But I have always used the dime in the middle when smashed.

make sure though that you don't skimp on this product. buy the very best and you won't regret it. video cards can often use a tear down and re-pasting.
-
@stefanq said:
I think I'll make some tests, clean and reapply just to be sure it is spread correct.
But don't go crazy about it... if you don't get it completely wrong there will be only a marginal difference of a few degrees, like the tests show. Just don't use too much paste.
Maybe it's more important to fasten the cooler evenly and get the right pressure on it. -
Yes, when I said don't skimp I mean on the quality of product... not the amount.
-
@stefanq said:
The question is why, on every reviews I watched, the thermal paste was applied onto the processor, with different techniques of course (little dot, line , spread etc.)
A small dot and pressure from heatsink works generally well, hand spreading the paste may be messy.
-
Thanks allot guys, I'll be monitoring the temperatures of the cores, and if it looks good, then the job is done. At this moment, in idle, the temperature is @37C (99F). Unfortunately, the cooler will be delivered tomorrow.
Regards,
Stefan -
The paste is a gap filler, and so the applied pressure is of minor importance. What you are doing is replacing the air (a poor conductor), with the paste (a better conductor). It is generally true that under very light pressure, two surfaces contact at 3 points (asperities). Increasing the contact pressure will 'crush' the asperities bringing more asperities into contact,increasing the surface area for heat conduction. The thermal paste has a better thermal conductivity than air, but still should be used thinly. You should aim to 'fill up' all the dips and hollows so that the gap is all paste with no air. These links might help:
http://en.wikipedia.org/wiki/Thermal_contact_conductance
http://en.wikipedia.org/wiki/Heat_sinkThis seems quite clear:
The important thing is not to entrain air when making the contact.
Kind regards,
Bob -
Appreciate all the comments guys, just finish the job one hour ago. I didn't succeed in the first place, because I tilted the cooler trying to push the screws into position.
I had to clean the paste and reapply. The good thing was that I saw how the paste spread, and it was perfect, all the surface of the processor, but nothing more. I used the line technique (horizontal one to match my cores position), a very very tiny skinny line, and I spread some on the cooler base as well. Those pipes who form the contact zone, didn't looked so good in reality, so I had to make sure to fill the gap between them.
I didn't had the inspiration to shoot some pictures, because I was too busy to curse, since I had to remove the motherboard from the case.Stupid junky case.
I have these temps with 25 degrees in the room, idle processor:
Temperatures:
Motherboard 38 °C (100 °F)
CPU 32 °C (90 °F)
CPU #1 / Core #1 35 °C (95 °F)
CPU #1 / Core #2 35 °C (95 °F)
CPU #1 / Core #3 40 °C (104 °F)
CPU #1 / Core #4 36 °C (97 °F)
GPU Diode (DispIO) 34 °C (93 °F)
GPU Diode (MemIO) 37 °C (99 °F)
Seagate ST3500320AS 32 °C (90 °F)
Now I find the GPU cooler annoying .....
Regards,
Stefan -
Springfield Missouri exterior temps 41f, interior temps 64f
Not rendering, but working.
i5 2500k at 4.8 ghz
Core 0 54c
Core 1 55c
Core 2 51c
Core 3 52c
Hello! It looks like you're interested in this conversation, but you don't have an account yet.
Getting fed up of having to scroll through the same posts each visit? When you register for an account, you'll always come back to exactly where you were before, and choose to be notified of new replies (either via email, or push notification). You'll also be able to save bookmarks and upvote posts to show your appreciation to other community members.
With your input, this post could be even better 💗
Register Login


Advertisement