sketchucation logo sketchucation
    • Login
    ℹ️ Licensed Extensions | FredoBatch, ElevationProfile, FredoSketch, LayOps, MatSim and Pic2Shape will require license from Sept 1st More Info

    Artisan Plugin (SDS2).....Cave

    Scheduled Pinned Locked Moved Gallery
    47 Posts 19 Posters 15.1k Views 19 Watching
    Loading More Posts
    • Oldest to Newest
    • Newest to Oldest
    • Most Votes
    Reply
    • Reply as topic
    Log in to reply
    This topic has been deleted. Only users with topic management privileges can see it.
    • olisheaO Offline
      olishea
      last edited by

      No UVs exactly. It was a really good seamless texture, its dirty concrete so its hard to tell if the alignment isn't correct. Any places where it was a bit distorted I used the paint brush tool in artisan. I have the material if anyone wants it, also the thea .mat file.

      If you were gonna do this properly, would slice the columns and the top and bottoms (using knife tool)....then cylindrically map the texture onto them. The walls and floor could just be textured seamlessly, no UVs.

      Pixero, you are given a preview of the subdivision so you don't actually have to execute the command. I just click space bar and it returns to the proxy. The preview will let you change the amount of iterations also....but once you have executed the subdivision/smoothing then you would have to 'undo' to get back to proxy.

      oli

      1 Reply Last reply Reply Quote 0
      • soloS Offline
        solo
        last edited by

        Pixero, when you select to subdivide you get a preview and an option to contine (hit enter)

        See images, first the basic proxy:

        cav1.jpg

        Then here is the 'Preview' of how it will look with 3 iriterations:

        cav2.jpg

        And then finally how it looks after subdivision:

        the cave.jpg

        http://www.solos-art.com

        If you see a toilet in your dreams do not use it.

        1 Reply Last reply Reply Quote 0
        • KrisidiousK Offline
          Krisidious
          last edited by

          that is so awesome.

          By: Kristoff Rand
          Home DesignerUnique House Plans

          1 Reply Last reply Reply Quote 0
          • olisheaO Offline
            olishea
            last edited by

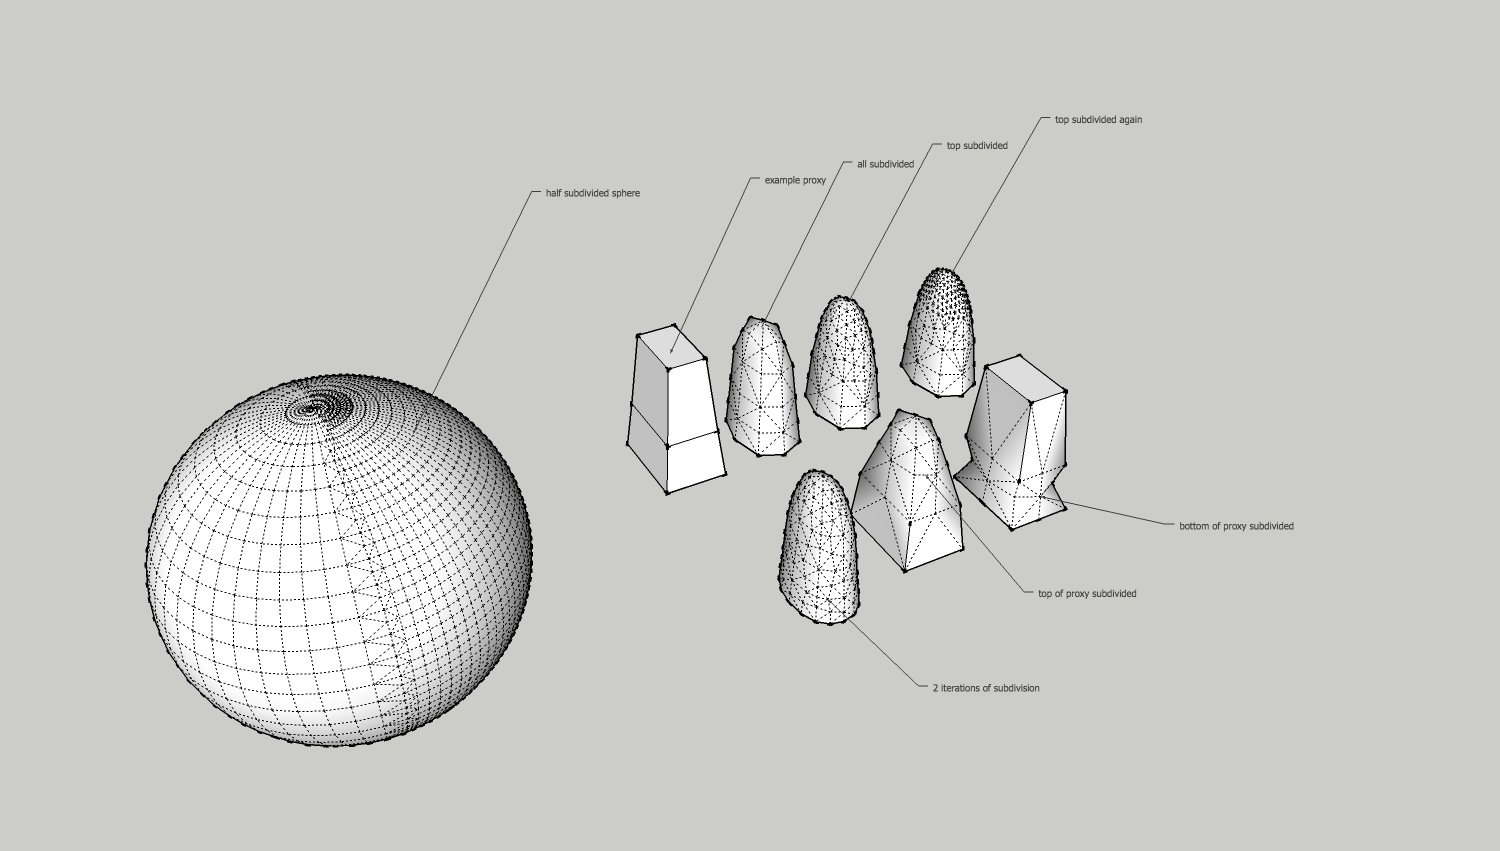
            it should be noted that artisan works on remote parts of a mesh and doesn't have to affect all of it.

            with subdivide and smooth 1 you could not select part of a mesh and subdivide it without affecting the whole surface.

            great if you want to smooth just a portion of a mesh, see screenshot.

            examples.jpg

            oli

            1 Reply Last reply Reply Quote 0
            • michaliszissiouM Offline
              michaliszissiou
              last edited by

              @unknownuser said:

              it should be noted that artisan works on remote parts of a mesh and doesn't have to affect all of it.

              πŸ‘
              Exactly,
              BTW to smooth the whole thing you must have a better computer than the one you have now. 🀣

              @solo
              Better to avoid smoothing on stretched faces like the ones you used on your fast version of cave. You wont be able to texture this stretched result decently.

              1 Reply Last reply Reply Quote 0
              • KrisidiousK Offline
                Krisidious
                last edited by

                for how far into the future can I expect to keep seeing plugins like this? when will SU ever reach it's Pinnacle? this is very exciting stuff. I don't even do very much organic modeling and it excites me... I can't imagine what the organic modeling people are thinking.

                By: Kristoff Rand
                Home DesignerUnique House Plans

                1 Reply Last reply Reply Quote 0
                • Z Offline
                  zikanglim
                  last edited by

                  @olishea said:

                  thanks man hehe, i'm making a tutorial for this scene...from modeling to rendering to photoshop touch-up. It could literally be made in minutes, although it took me hours of fannying around. πŸ˜†

                  Hey do you think I can get the tutorial video website from you? Would love to learn modeling the caves. Please πŸ˜„

                  1 Reply Last reply Reply Quote 0
                  • olisheaO Offline
                    olishea
                    last edited by

                    I never actually got round to making a full tutorial for this scene. Work kinda got in the way. It really is not difficult; the texture works because it's relatively seamless in both directions.

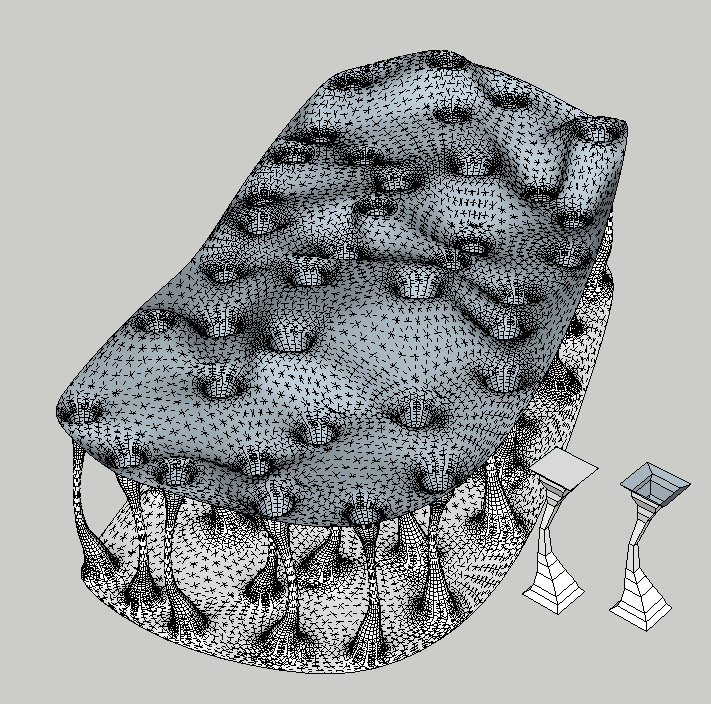
                    Repeating what I wrote earlier, the image should really help explain it:

                    @unknownuser said:

                    a view from above. look how clean the mesh is around the column caps, its completely homogenous, no intersecting or anything....thats a typical proxy to the right. Deleting internal faces helps create a clean result. (remove inner faces.rb). this is an early version of the model before I sculpted the floor, notice how it was flat.....you can paint contours into it. πŸ˜„ i removed the walls for clarity....they were made using the free hand tool, push pull and then artisan, about 5 minutes each.
                    http://i654.photobucket.com/albums/uu269/olishea/Picture59.png

                    oli

                    1 Reply Last reply Reply Quote 0
                    • J Offline
                      jpalm32
                      last edited by

                      Very interesting work Oli.
                      How large is it with the walls?

                      1 Reply Last reply Reply Quote 0
                      • olisheaO Offline
                        olishea
                        last edited by

                        Thanks jpalm, I wish I had more time to keep making models like this.

                        It wasn't very large at all, most of the file size came from the texture. It was very fluid and easy to navigate.

                        I forgot to mention I used sketchup's native "from contours" tool (sandbox) to link up the tops and bottoms of the "columns"...this was then subdivided a few times.

                        The morning Thea render had no direct light; only physical sky was used to give a general glow. I love Thea's physical sky. For the afternoon shots I used direct sunlight and physical sky combined. For the misty afternoon shot I added the volumetric fog in photoshop, bit of a cheat really but I never got my head round volumetric materials especially as my dual core computer was rendering them soooooo slooooooow! πŸ˜†

                        41MB in total
                        477,526 edges
                        314,374 faces

                        If anyone wants me to upload this model for playing/rendering let me know and I'll make a download link. πŸ˜„

                        oli

                        1 Reply Last reply Reply Quote 0
                        • 1
                        • 2
                        • 3
                        • 3 / 3
                        • First post
                          Last post
                        Buy SketchPlus
                        Buy SUbD
                        Buy WrapR
                        Buy eBook
                        Buy Modelur
                        Buy Vertex Tools
                        Buy SketchCuisine
                        Buy FormFonts

                        Advertisement