Construction Technique Pointers Request
-


@unknownuser said:
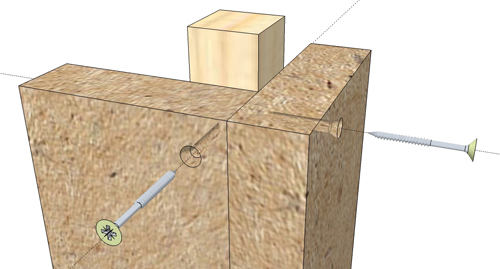
Fastening MDF, particle board, or Melamine board presents a special challenge: each of these man-made materials is basically composed of wood dust in a resin matrix — there is no traditional grain structure to resist withdrawal forces. The material is all end-grain, and basically fastening into end-grain can be problematic. Fortunately, there are solutions: Confirmat (also known as Cabinet Connecting screws), RTA connecting screws in combination with barrel nuts, or very long deep threaded cabinet screws.
Confirmat screws are unique fasteners developed specifically for edge-to-face joining of particle-based products like melamine board. They feature deep threads on an oversize shank, a clearance-hole diameter shoulder beneath the head, and a head that is just slightly larger than the shoulder. Installation requires a special 3-step drill bit, but the result is a tight, strong joint. Learn more about Confirmat Screws.
RTA screws provide superior joint strength compared to Cabinet Connecting screws, but the joint construction is more “fussy.” The screws themselves have large, wafer heads, blunt tips, and machine screw threads. The screws mate with small cylindrical “barrel nuts” that have a machine threaded hole in them formed perpendicular to the barrel axis. Installation requires precise drilling of two blind holes, but the system is readily adaptable to a wide variety of materials and joint conditions.
If assembly speed is a primary consideration, simply using an extra-long cabinet screw (such as our FSL’s or ProMax
 series screws) provides a low-cost alternative. When working close to the panel edge, predrilling is extremely important (even when using auger point screws), since these man-made materials are prone to crumbling. Generally, these screws are best used as permanent clamps while an adhesive is curing, rather than as a primary fastener in this application.
 -
Cool, thanks for that dedmin.
Progress pics soon.
-
@dave r said:

Sorry, Dave, one more question that I forgot to ask the other day; Am I to assemble the corner joints as you have described here, screwing the face to edge, and then (I'm assuming) glue the corner bracing into the inner corner?
Or should I be screwing into the bracing as shown here:
Sorry for the noob question, but this is unknown territory to me. Also, I've worked out a rudimentary construction/assembly procedure, if you have some spare time, would you care to critique? -
No need to apologize. It's a perfectly valid question. Especially considering what I wrote and drew. What you've shown would be right with the corner blocking except you would want to stagger the screws vertically so they don't collide. As to gluing, glue all of the surfaces that touch each other.
Probably the easiest way to assemble the corner is to glue and screw the corner blocks to the front and back pieces so they are flush with the ends of the boards. Then glue and screw the front and back to the end panels. These things would apply to both MDF and plywood.
I'd be happy to take a look at your construction/assembly procedure.
-
Hi Dave,
Check your PM for the assembly list and a link to the latest iteration of the booth model - it was slightly too big to attach to a PM.
Heh, yeah. I thought about the staggering of the fasteners just as I was posting. I'll fix that in edit.

Thanks for the clarification on the bracing. I figured that was the way to do it, but I just wanted to be sure. By the way, do you foresee any problems with screwing so close to the edge of the MDF?
It took me so long to get back here because I had a bear of a time trying to figure out the best way to mount the blower, but still make it accessible for repair in case the blower needs to be replaced or something.
I ended up going with a sort of slide out panel in the bottom of the booth. Lay the booth on it's back, slide out the blower mount, replace the blower, slide the mount back in, stand the unit back up, and you're all set - no disassembly required.
I had to rack my brain for that one. Hopefully it works the way I envision it.
Thanks again for the help.
-Duncan -
Duncan,
I like the way you mounted the blower to that slide out piece. That makes a lot of sense.
I've read through your list and looked at your latest version of the model. I think I have some ideas for you for the list and I'll write them down as soon as I can.
Since you've removed the materials from most of the model, you could delete at least the MDF texture to reduce the file size. Then you could post it here if you wish.
What format do you intend to use for the plans for this thing?
-
Yeah, that MDF texture file is pretty large. I think it was being used on that section cut face which is on a hidden layer. It could be deleted as well as the hidden dimensions which aren't very useful without the section cut.
Yes, I was thinking in terms of PDF file. I would think you could do the entire thing with SketchUp and LayOut with no problems.
Well, I'm off to fix an oxygen outlet.
Cheers,
Dave
-
Have you talked to John Wilkes about this?
-
I'm afraid I don't know who Mr. Wilkes is, so no, I have not.
-
So you were the guy in history class who looked like he was taking notes but was really doing architectural and construction doodles.
John Wilkes' Booth (The guy that shot President Lincoln).
-
.
-
Doh!
Sic semper fatuus.

-
@dave r said:
I've read through your list and looked at your latest version of the model. I think I have some ideas for you for the list and I'll write them down as soon as I can.
Cool. Take your time.
@dave r said:
Since you've removed the materials from most of the model, you could delete at least the MDF texture to reduce the file size. Then you could post it here if you wish.
SketchUp told me it was still in use, but I couldn't see where. No matter. I deleted it anyway - huge difference! That's a pretty big texture file, no wonder my puny little laptop was chugging! LOL!
@dave r said:
What format do you intend to use for the plans for this thing?
How do you mean? Like PDF file format, or do you mean like A3, or ArchD, etc.? I was going to output to PDF in a hybrid magazine article/shop drawing kinda thing, if that makes sense.
Basically a letter size portrait layout for the "Article" portion (the assembly procedure), with an "Appendix" of shop drawings, also letter sized but landscape oriented, if they are needed. Just so the average Joe can print the plans out on a regular desktop printer.
If you've got other ideas, I'm all ears - this is my first time, so I'm just wingin' it!
Workflow:
SketchUp->LayOut->PDF->(maybe)InDesign, if it needs a polish.Thanks for looking
-Duncan
Hello! It looks like you're interested in this conversation, but you don't have an account yet.
Getting fed up of having to scroll through the same posts each visit? When you register for an account, you'll always come back to exactly where you were before, and choose to be notified of new replies (either via email, or push notification). You'll also be able to save bookmarks and upvote posts to show your appreciation to other community members.
With your input, this post could be even better 💗
Register Login


Advertisement