Creating Hexagons out of Plywood
-
Some of you may have seen the posts I've made over in the Corner Bar about creating a hexagonal shaped hub part.
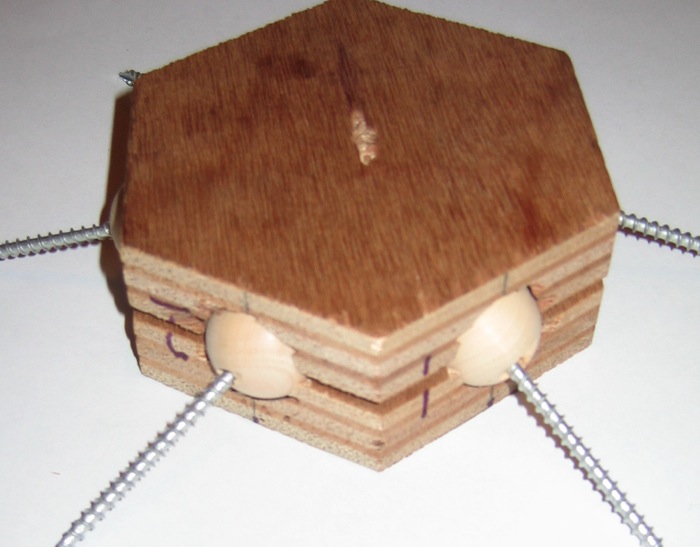
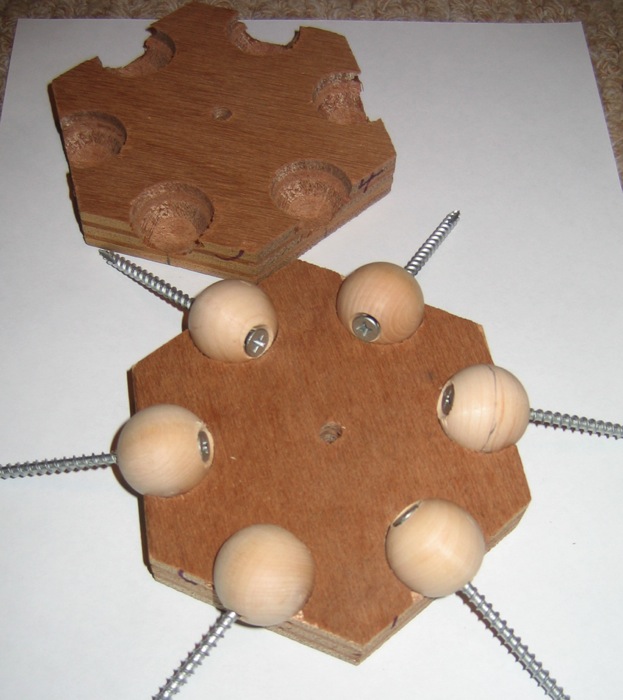
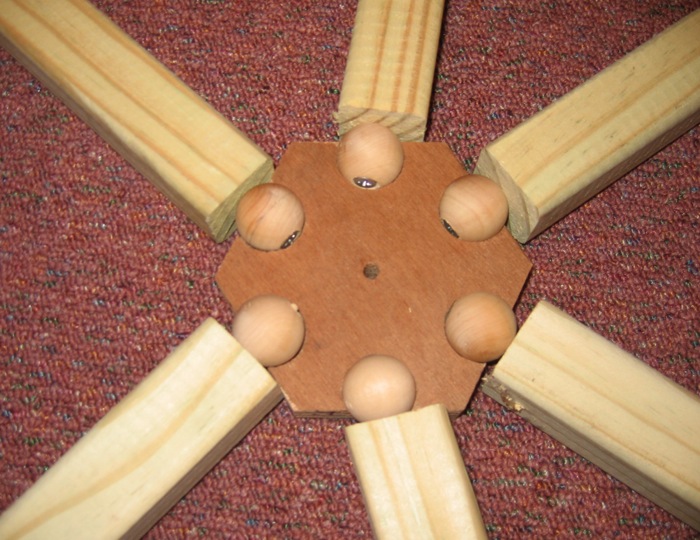
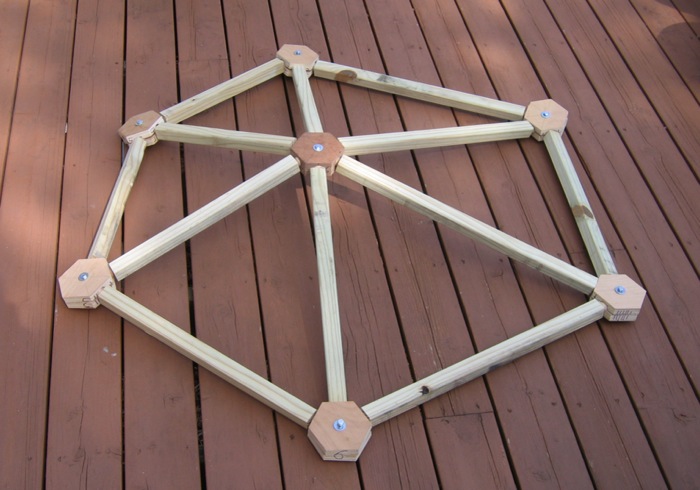
As other options proved to be too expensive I decided to try making this part out of wood. (See images below.) Given the tools I have access to, and my lack of woodworking skills, I'm reasonably pleased with the results and want to continue experimenting. To do that I need more hexagonal hubs, and hubs cut more accurately than the ones I've made so far. I'm pretty sure that someone with a good table saw, and a couple of easily made jigs, could turn out the hubs fairly quickly. If anyone is interested please get in touch and perhaps we can reach a mutually agreeable arrangement for producing a bunch of these.
Thanks,
Fred
-
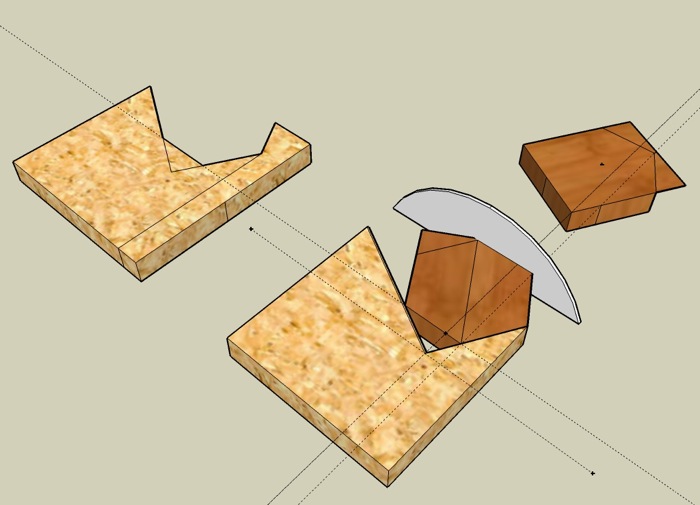
I just want to make sure that my offer in the previous post was clear. That offer being that I would be happy to pay someone a mutually agreeable fee to produce a bunch of hexagon blanks out of plywood. The image below shows the jigs that I believe would be needed to facilitate the cutting of the hexagons on a table saw. The attached SketchUp file contains these as well. If only it were as easy to make these with real wood as it is with SketchUp.
Thanks for considering.
Fred
-
@fbartels said:
I just want to make sure that my offer in the previous post was clear. That offer being that I would be happy to pay someone a mutually agreeable fee to produce a bunch of hexagon blanks out of plywood. The image below shows the jigs that I believe would be needed to facilitate the cutting of the hexagons on a table saw. The attached SketchUp file contains these as well. If only it were as easy to make these with real wood as it is with SketchUp.
Thanks for considering.
Fred
[attachment=2:20nidcpr]<!-- ia2 -->jigs.jpg<!-- ia2 -->[/attachment:20nidcpr]
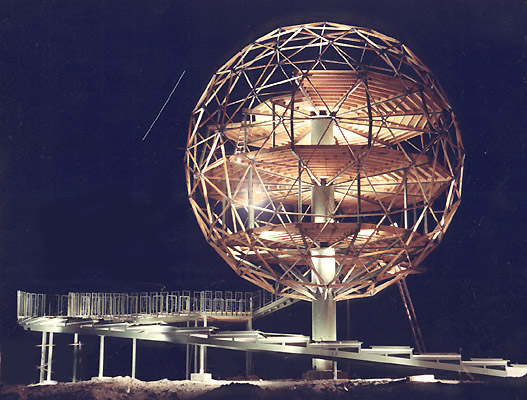
Are you wedded to this type of connector? I can show you another simpler solution. I took this photo 30 or 40 years ago while this dome was under construction. I even helped four a couple hours when the builder ran out of hands while it was going up. His solution was a universal solution that accommodates various angles and numbers of connections.
-
Roger,
No wedding vows exchanged re the type of connector. I'm looking for solutions that work and are implementable easily and inexpensively. Please share the simpler solution!
Thanks,
Fred
PS Is the dome house still around?
-
@fbartels said:
PS Is the dome house still around?
I don't know if it's the same one, but I see this house every time I drive Interstate 40 through Yucca, Arizona...

The picture is a screen capture from Google Maps street view. -
Sure looks like it. How many spherical houses can there be in Arizona?
-
Yes, these domes are one and the same. The night shot is my progress photo and the version with the skin shows the same scene 40 years later.
I even helped build it. I was doing some 16mm filming, and Billy Woods, the inventor of this system, needed some extra hands to force a set of connecting spars into place. The ball in the air has a whole different set of forces than a hemisphere on the ground.
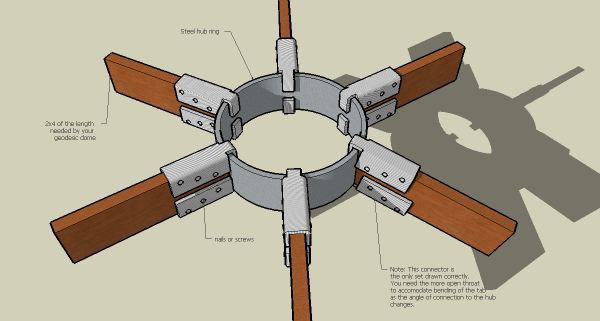
The beauty of the connector is that it is universal and easy to make. It will adapt to the many angles found in complex domes. The dome was built as the sales office for a crooked land company. Since then it has been sold as a private residence/UFO museum.
This dome is also pictured in Stewart Brands book, "How Buildings Learn."
Photographing the building at night was fun. Rattle snakes and coyotes kept me company. I was painting with flash and did so many flashes that the capacitors in my flash gun blew up as I returned to the camera to close the shutter. Since I originally photographed the building I have seen it twice. Once some producers working for HGTV did a program on extreme homes and got a hold of a photo shot earlier the same evening. They ripped me off by using it without my permission. Then recently I attended a combat photographers convention in Las Vegas and on the way back I said to my wife, "do you want to see an interesting chapter from my past." She said "no," so I said "we are going anyhow."
-
Roger,
Thanks for making the model.
@unknownuser said:
on the way back I said to my wife, "do you want to see an interesting chapter from my past." She said "no," so I said "we are going anyhow."
Ahhh, the simple joys of married life.

Looks like an interesting elegant strong solution. Did he just hammer the tabs flush with the inside of the ring? Why do you suppose it didn't catch on as a system for dome frames?
Fred
-
@fbartels said:
Roger,
Thanks for making the model.
@unknownuser said:
on the way back I said to my wife, "do you want to see an interesting chapter from my past." She said "no," so I said "we are going anyhow."
Ahhh, the simple joys of married life.

Looks like an interesting elegant strong solution. Did he just hammer the tabs flush with the inside of the ring? Why do you suppose it didn't catch on as a system for dome frames?
Fred
It wasn't even necessary to get a perfect fit. Billy just hammered the tab to an approximate angle that was good enough to get a grip. The connectors were put on as the dome was assembled. He used a come-along to pull the hubs until the were the right distance apart then we attached the connectors and confirmed the distance with a tape measure. When the distance was thes same as the calculated distance we screwed the connectors in place. A little play was good so the surface could adjust as the building was assembled. Attaching the skin added the final rigidity. According to my recent eyeball inspection the 40 year old structure seems to have more structural integrety than my 20-year-old house.
I think Billy patented the connectors and then used them only on his own buildings which limited distribution to the a few odd buildings here and there. I lost track of the guy and have no idea what happened to him.
The proportions in the drawing are off. I think he made the connectors by cutting box tube.
What sort of a project are you contemplating?
--Roger
-
Hi Roger,
Looked in "How Buildings Learn" (what a great book) and there it is on page 59. The picture has the following label: "Though it was competently built by Bill Woods of Dyna Domes, Phoenix, soundness and shear flash were not enough to keep so unwieldy a space occupied."
Brand, in the text on the same page writes...
"As for domes, fancied by architects through the ages, the findings are now in, based on an entire generation's experience with Buckminster Fuller geodesic domes of the 1970s. They were much touted in the architecture magazines of the period. As a major propagandist for Fuller domes in my Whole Earth Catalogs, I can report with mixed chagrin and glee that they were a massive, total failure."
He goes on to elaborate the failures in detail. Ouch.
Luckily, I'm not planning on building a dome, just a curved roof. I plan to start with a gazebo and see how that goes before even thinking about anything larger. I have to say though, that Bill Wood's steel hub system approach increases my confidence that house-sized curved roofs are feasible both structurally and economically.
It's funny how the materials you are familiar with constrain your thinking. I've never worked with steel (other than nuts, bolts, screws) so it never occurred to me to try an approach where just tabs would hold the spoke to the hub. Anyone have recommendations regarding finding/creating the steel parts shown in Roger's sketchup model?
Fred
-
Hi Fred, hi folks.
Sorry to be late but I had upload problems a few weeks ago and then I forgot about this post.
See attached SU file that I developped as ideas for your problem, trying to simplify the production of your wood hexagons.
-
Hi Jean,
Thanks so much for giving this some careful thought. Looks like a productive approach you've developed. If you ripped the 6" strips with a skill saw then a table saw would not be needed. It is great to have a variety approaches to solving this problem.
Fred
-
Hi Fred, hi folks.
Of course, using carefully clamped guides, you can rip the 6" strips with a skill saw. The set-up migth take a bit more time than with a table saw but the cost is lower since a table saw with extension to stabilise a 4' x 8' board is more expensive than a skill saw.
Like you wote, its just ideas.
One more idea that I had after posting is that, once you have the 6" strips, you can stack them to cut more than one at a time to produce the rectangular blocks. If the stop block on the miter saw can stabilise the part, maybe you cna cut 2, 3 or even 4 at a time as long as no slippage occurs. Even the cutting of the corners could be done with stacked blocks. This is just to save time if you have many hundred of these to produce.
Just ideas.
-
So it took me a year to answer, I never was known for speed. Cut the rings from a large steel pipe using a cut off saw. Cut the clips from sheet steel with a torch, clean up with a grinding wheel, and bend to shape with a vice and hammer.
Advertisement


